
RC26. Building a CPU
Daily dispatches from my 12 weeks at the Recurse Center in Summer 2023
The main thing I worked on today was building (okay “building,” in .hdl) the CPU for my simulated nand2tetris machine using components previously featured here, such as a program counter, some big arrays of RAM, and an ALU, among other things.
Building the CPU was a particularly rewarding exercise, since it meant thinking through the logic that enabled us to do what we did last week, namely writing a few simple programs in assembly language.
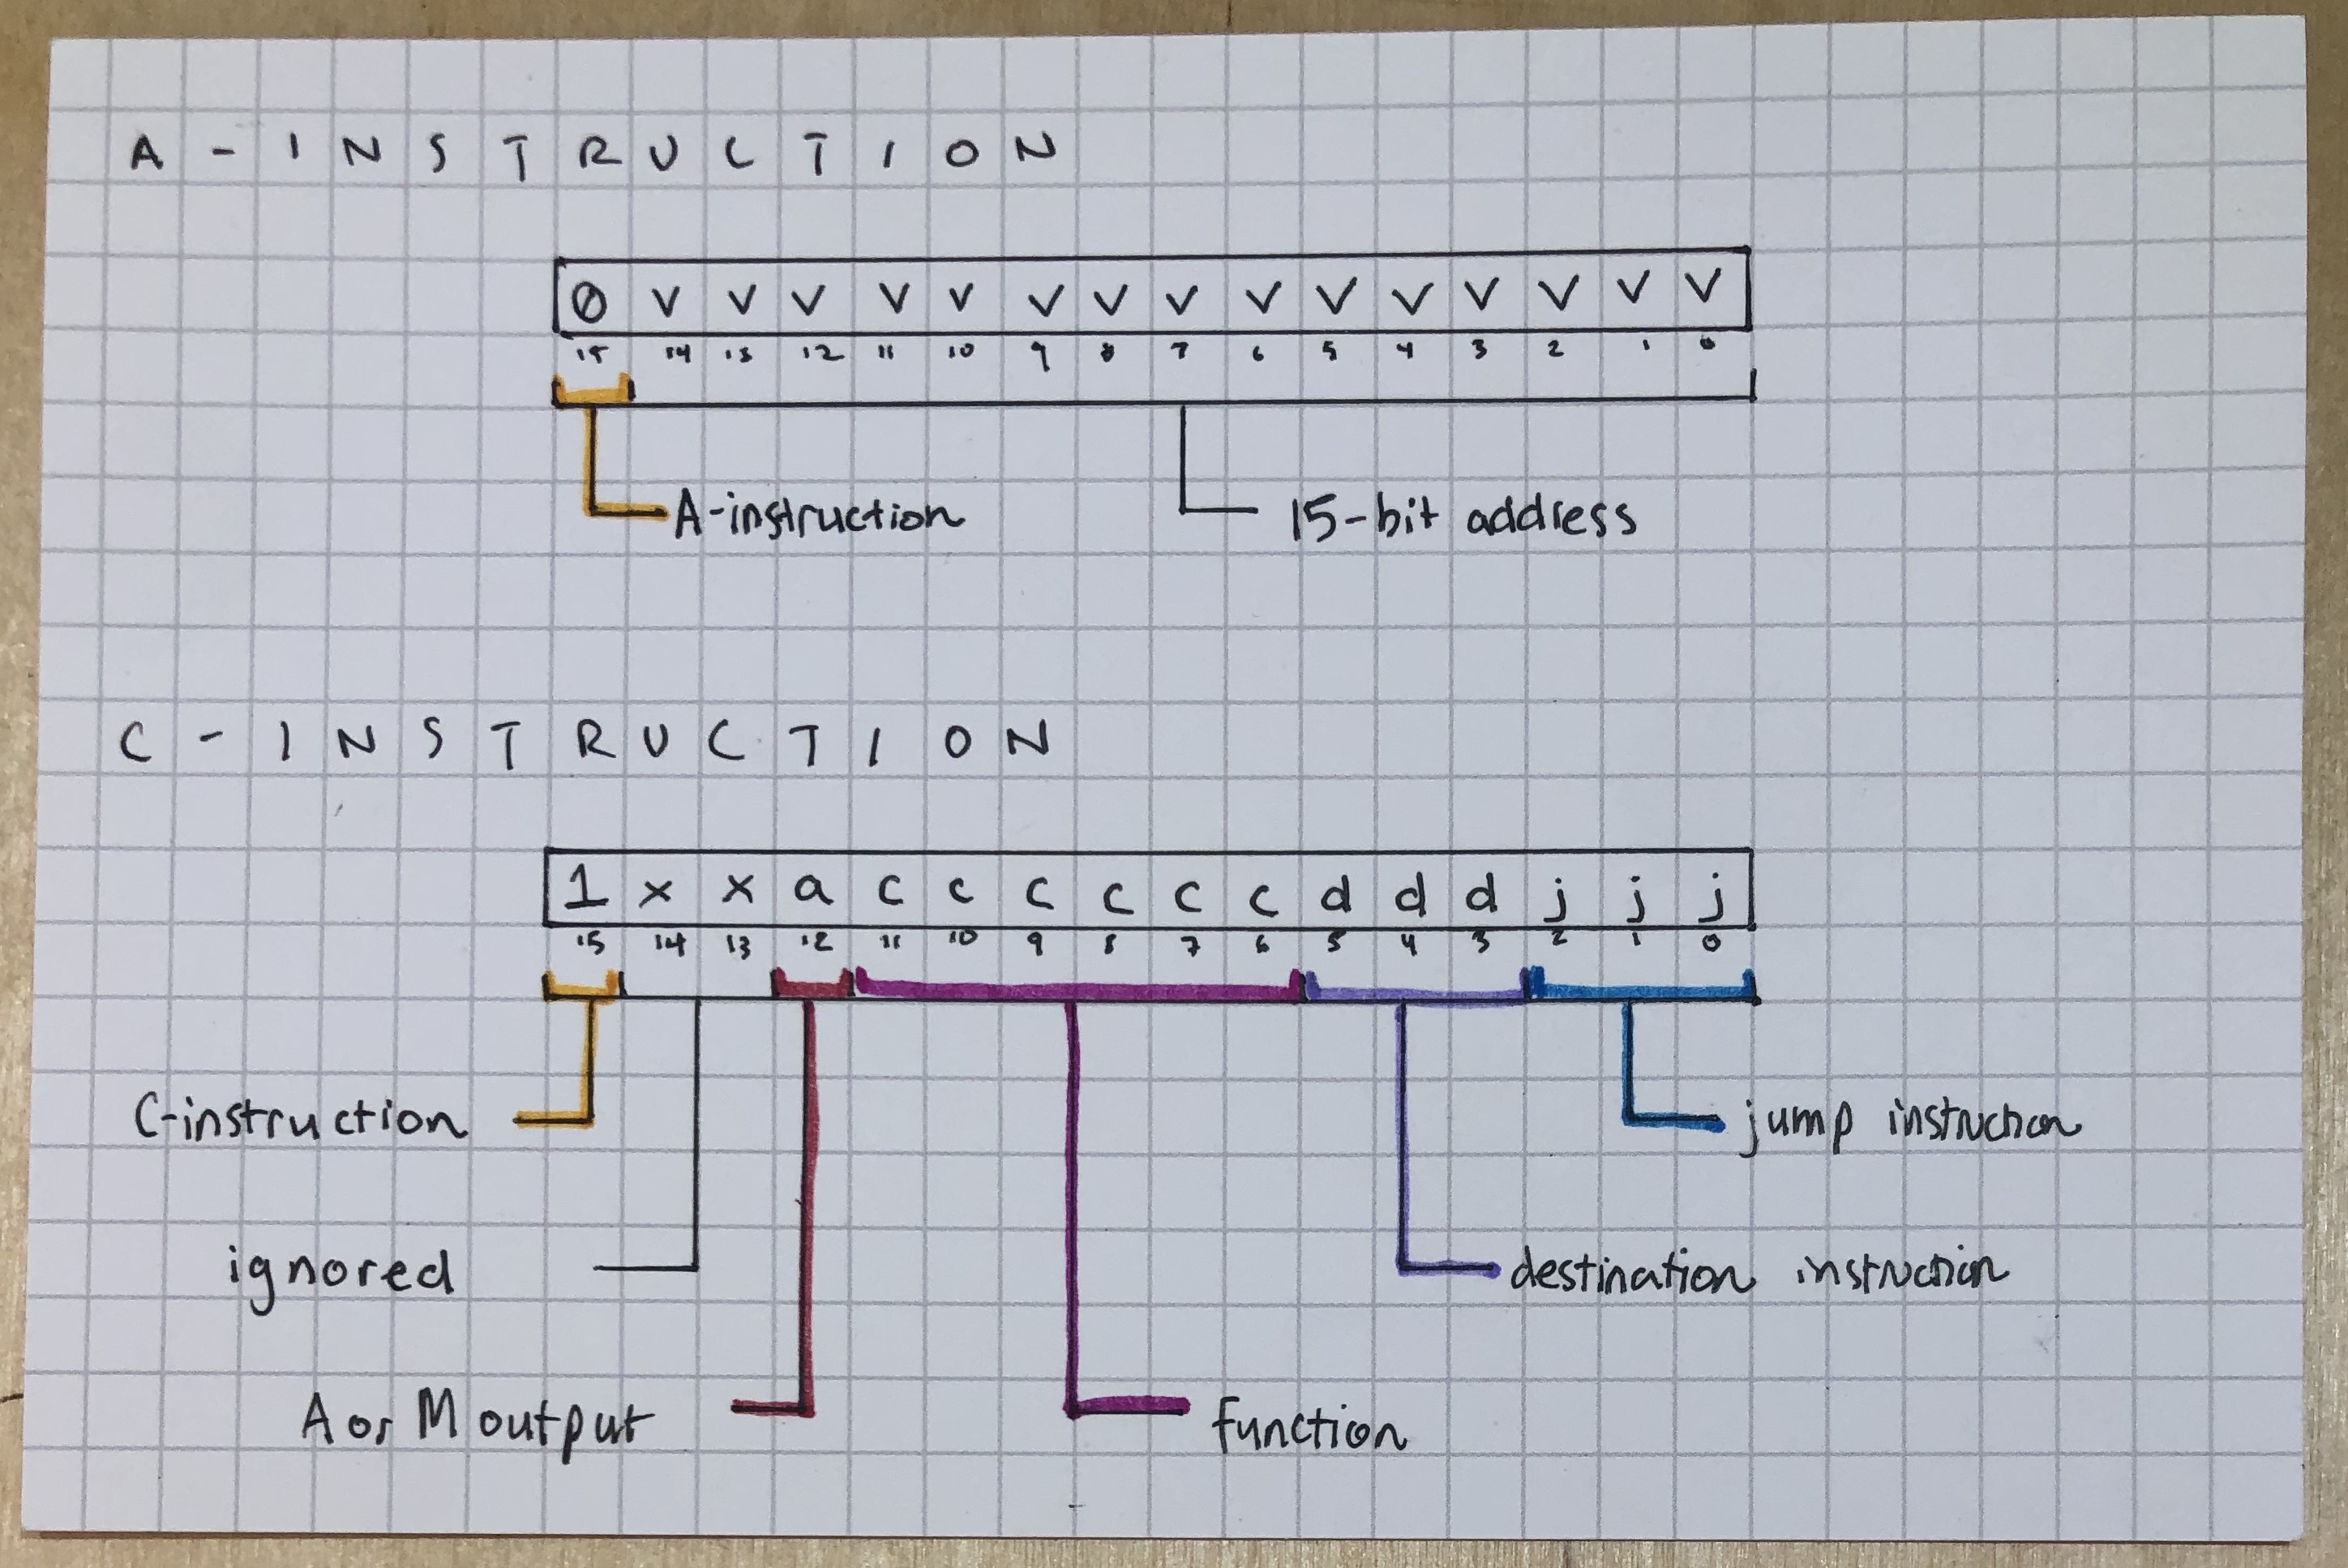
A-instructions and C-instructions
This was something that I sort of skated over last week but had to contend with this time around. Our CPU needs to handle two kinds of instructions: A instructions (A for address, although the instruction need not always refer to a memory address) and C instructions (C for … computation?). Both are 16-bits of information, but they work in very different ways and do very different things.
A Instructions
| 0 | v | v | v | v | v | v | v | v | v | v | v | v | v | v | v |
| 15 | 14 | 13 | 12 | 11 | 10 | 9 | 8 | 7 | 6 | 5 | 4 | 3 | 2 | 1 | 0 |
An A instruction is identified as such by the most significant bit being 0. The remaining 15 bits comprise a 15-bit address – anything from 0 to 32,767. When writing assembly, an address instruction looks like this:
@4 => 0000 0000 0000 0100
or
@1528 => 0000 0101 1111 1000
or even
@SCREEN => 0100 0000 0000 0000 (16,384)
since, in this version of assembly, there are a few symbolic constants such as SCREEN, which just refer to a number (in this case, 16,384).
C Instructions
| 1 | x | x | a | c | c | c | c | c | c | d | d | d | j | j | j |
| 15 | 14 | 13 | 12 | 11 | 10 | 9 | 8 | 7 | 6 | 5 | 4 | 3 | 2 | 1 | 0 |
If A instructions are identified by the most significant bit being 0, C instructions are are identified by the most significant bit being 1. After that, though, the commonalities end. C instructions are a bit more complicated since they encode a variety of different pieces of information.
- the a bit (bit 12) dictates whether the ALU should accept its
yinput from the A Register or from somewhere in Memory - the 6 c bits (bits 6-11) specify the ALU function and are fed into its 6 function inputs
zx,nx,zy,ny,f, andno. - the 3 d bits (bits 3-5) specify the destination for the ALU’s output, either
M(memory),A(A register), orD(D register), or some combination of the three. - the 3 j bits (bits 0-2) specify any jump command based on whether the ALU’s output is
< 0,<= 0,== 0,>= 0, or> 0.
I’ve already written about the various computations the ALU is capable of doing based on its 6 inputs, but let’s take a closer look at the destination and jump logic.
DESTINATION
| d5 | d4 | d3 | Mnemonic | Destination |
|---|---|---|---|---|
| 0 | 0 | 0 | null | Don't store anywhere |
| 0 | 0 | 1 | M | Memory[A] |
| 0 | 1 | 0 | D | D Register |
| 0 | 1 | 1 | MD | Memory[A], D Register |
| 1 | 0 | 0 | A | A Register |
| 1 | 0 | 1 | AM | A Register, Memory[A] |
| 1 | 1 | 0 | AD | A Register, D Register |
| 1 | 1 | 1 | AMD | A Register, Memory[A], D Register |
After looking closely at this, it makes a lot of sense:
- if d3 is high, we want to store the ALU’s output in memory (
M) at the address currently being output by the A register - if d4 is high, we want to store the ALU’s output in the D register (
D) - if d5 is high, we want to store the ALU’s output in the
Aregister
By combining these bits, we can send the ALU output to multiple places at once.
JUMP
| j2 | j1 | j0 | Mnemonic | Jump Command |
|---|---|---|---|---|
| 0 | 0 | 0 | null | No jump |
| 0 | 0 | 1 | JGT | Jump if out > 0 |
| 0 | 1 | 0 | JEQ | Jump if out = 0 |
| 0 | 1 | 1 | JGE | Jump if out >= 0 |
| 1 | 0 | 0 | JLT | Jump if out < 0 |
| 1 | 0 | 1 | JNE | Jump if out != 0 |
| 1 | 1 | 0 | JLE | Jump if out <= 0 |
| 1 | 1 | 1 | JMP | Jump |
The logic table for the three jump bits works similarly:
- if j0 is high, we want to jump if the ALU output is > 0
- if j1 is high, we want to jump if the ALU output == 0
- if j2 is high, we want to jump if the ALU output < 0
Here, too, we can combine these bits to create other jump conditions: if out <= 0 or >= 0 or != 0, etc.
C-Instruction Example 1
Let’s look at a few C-instructions, then, and try to intpret them:
M=D+1 => 1xx0 0111 1100 1000
| 1 | x | x | 0 | 0 | 1 | 1 | 1 | 1 | 1 | 0 | 0 | 1 | 0 | 0 | 0 |
| 15 | 14 | 13 | 12 | 11 | 10 | 9 | 8 | 7 | 6 | 5 | 4 | 3 | 2 | 1 | 0 |
Here, we’re taking the value in the D register and adding 1, then we’re storing the value to Memory using whatever address is currently in the A Register. (Normally c-instructions outputting to memory will follow an a-instruction that sets the A Register for this very reason).
- instruction type[15]: 1 => C-instruction
- A/M flag[12]: 0 => use A Register
- function[6..11]: 011111 => compute
D + 1 - destination[3..5]: 001 => send ALU out to
M(at whatever address currently in A Register) - jump[0..2]: 000 => no jump
C-Instruction Example 2
Here’s a more complex example that involves an a-instruction/c-instruction pair:
@1523 => 0000 0101 1111 1100
D;JLE => 1xx0 0011 0000 0110
| 0 | 0 | 0 | 0 | 0 | 1 | 0 | 1 | 1 | 1 | 1 | 1 | 1 | 1 | 0 | 0 |
| 15 | 14 | 13 | 12 | 11 | 10 | 9 | 8 | 7 | 6 | 5 | 4 | 3 | 2 | 1 | 0 |
| 1 | x | x | 0 | 0 | 0 | 1 | 1 | 0 | 0 | 0 | 0 | 0 | 1 | 1 | 0 |
| 15 | 14 | 13 | 12 | 11 | 10 | 9 | 8 | 7 | 6 | 5 | 4 | 3 | 2 | 1 | 0 |
First, we’re setting the A Register to carry a value of 1523. This value can then be input directly into an ALU compuation or, as we’re doing here, it can be be used as an address. Whether we do one versus the other is a function of the c-instruction that follows.
Next, we follow the c-instruction, which is saying to jump to the instruction number specified on the A Register (we just set this to 1523 – evidently this is a lengthy piece of assembly code!) but only if the value at the D register is less than or equal to 0.
- instruction type[15]: 1 => C-instruction
- A/M flag[12]: 0 => use A Register
- function[6..11]: 001100 => compute
D(i.e., output whatever’s on the D register) - destination[3..5]: 000 => no destination here, since we’re not storing the ALU’s output anywhere
- jump[0..2]: 110 => Jump to instruction 1523 if the value coming out of the ALU (in this case, whatever’s on the D register) is less than or equal to 0.
In a nutshell, that’s how this all works.
When it comes to the CPU, then, generally what’s going to happen is this:
- If we see an A-instruction, we’ll need to stick it in the A register so that we can potentially do something with it later.
- If we see a C instruction, we break out its various
a,c,d, andjbits and make use of them to do CPU-y things.
The CPU
Here’s a summary of the A- and C-instructions:
And here’s what the CPU logic looks like that behaves according to the A- and C-instructions coming in:
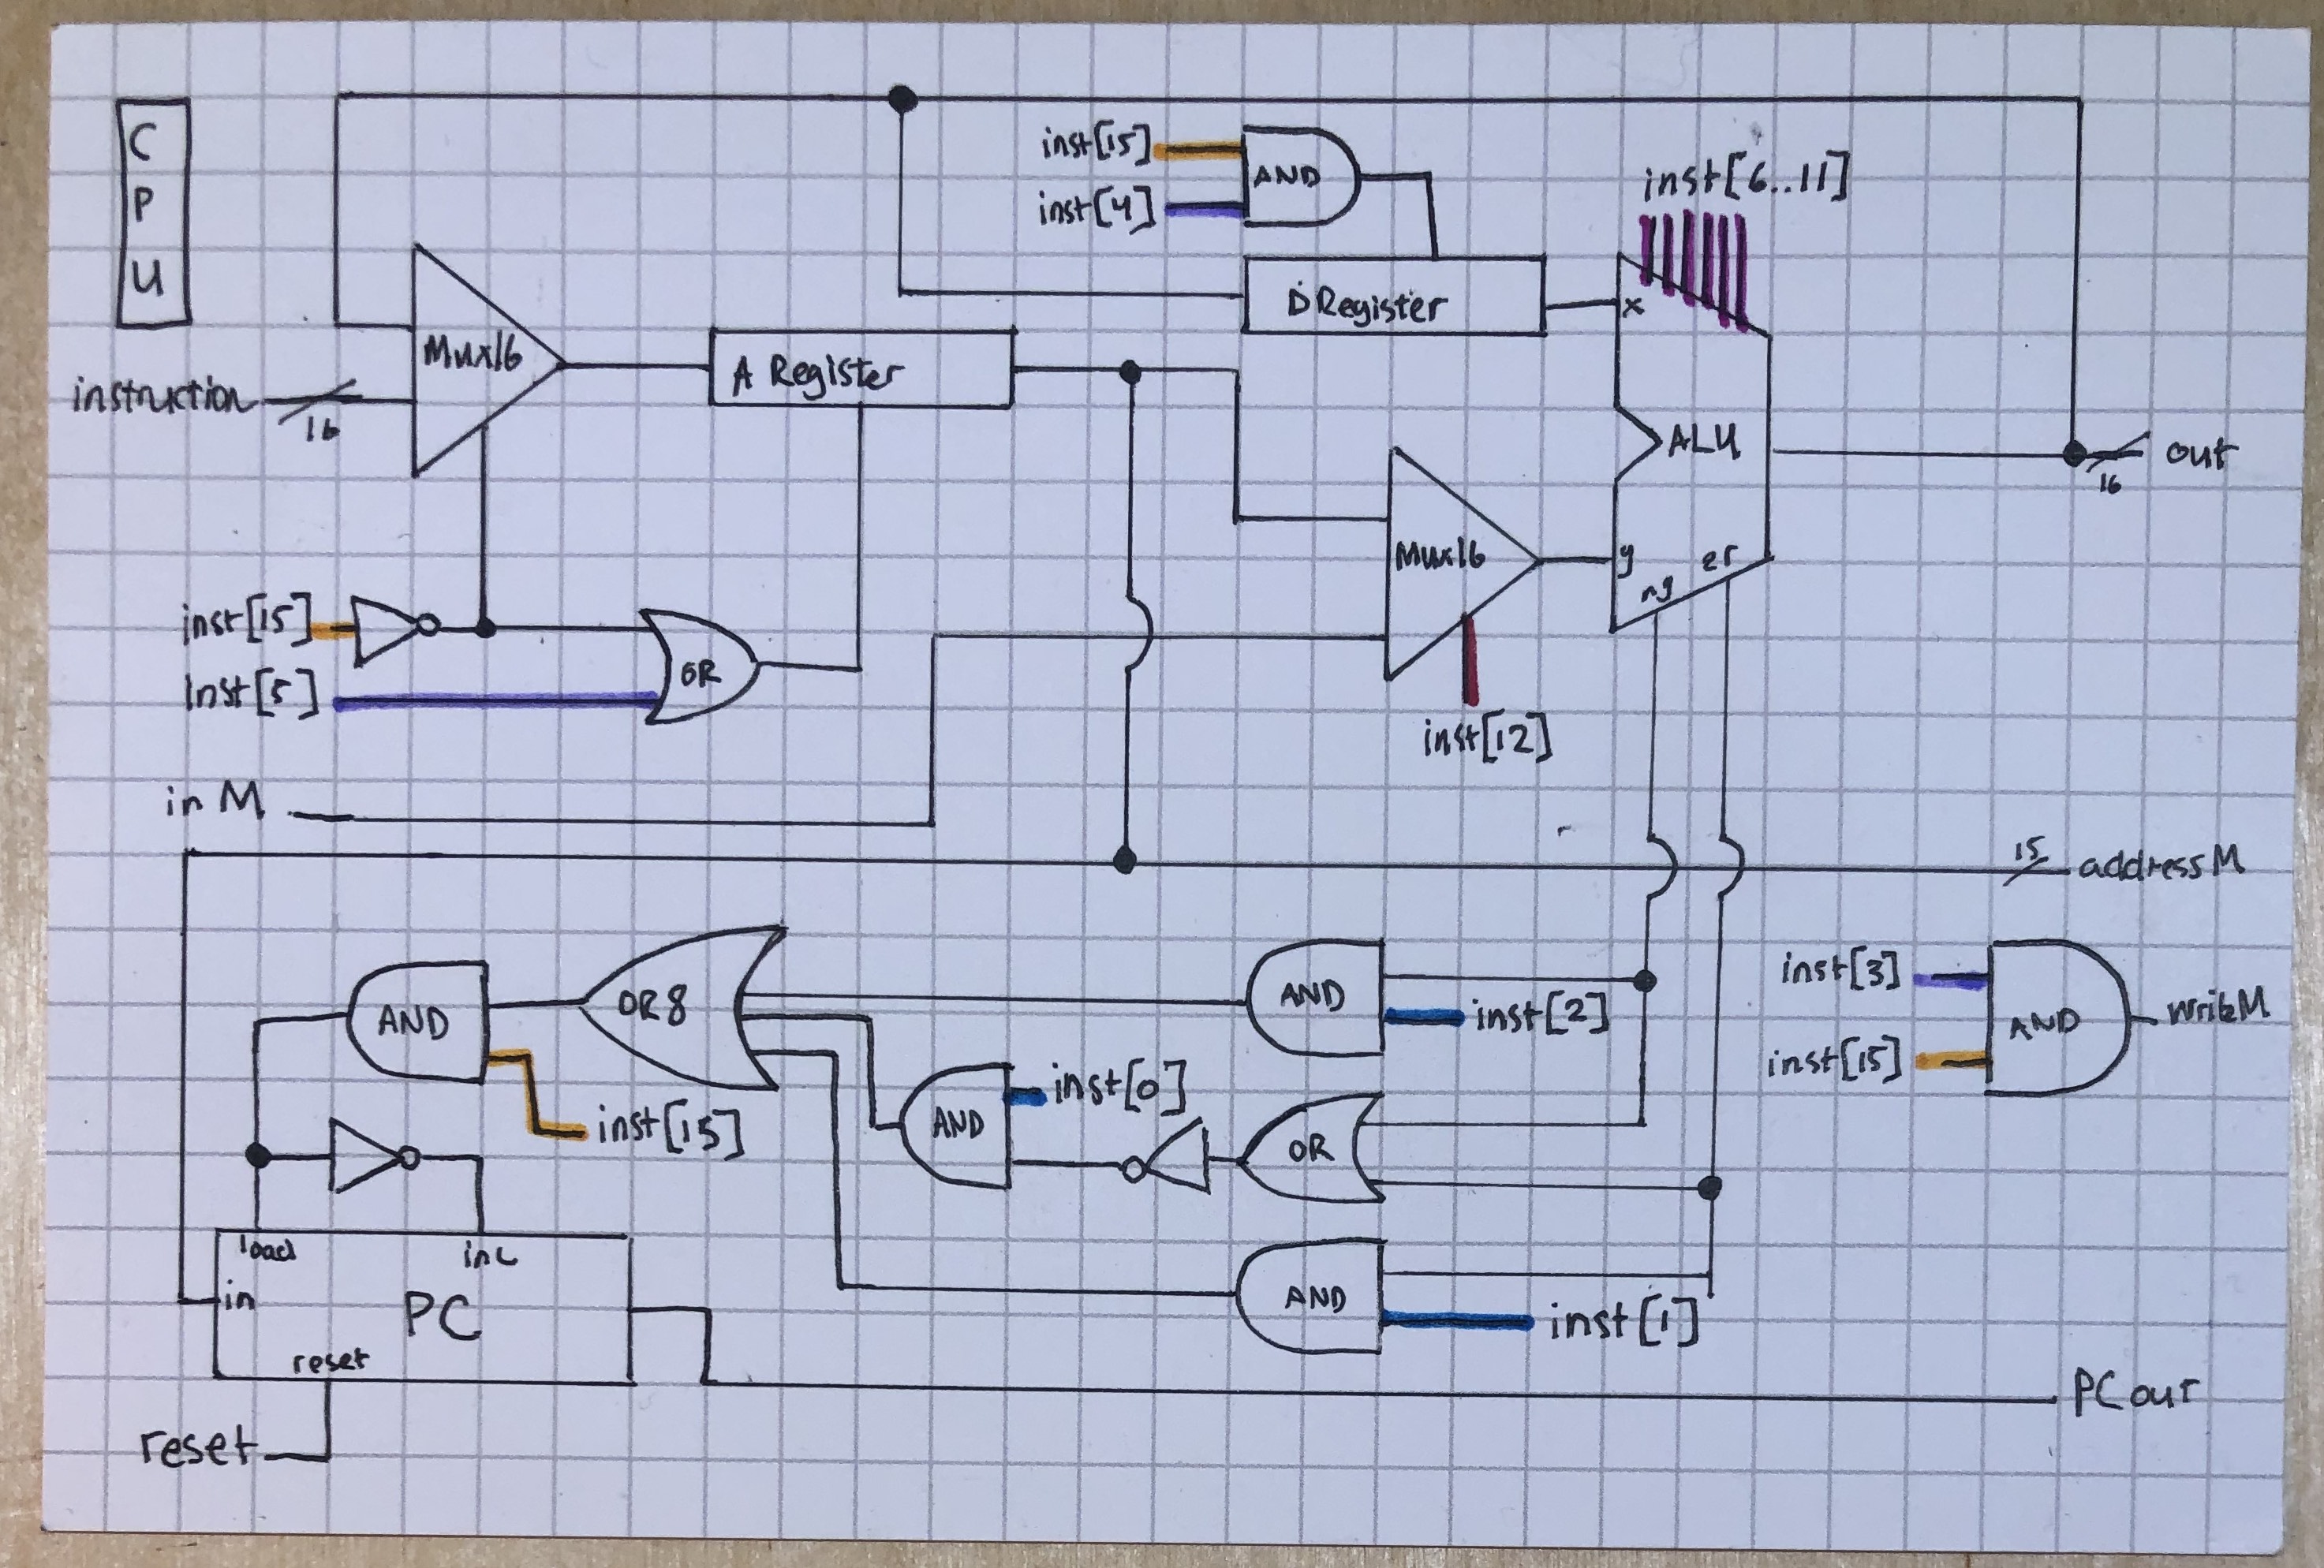
There’s a lot going on here, which is why I color-coded each of the C-instruction a, c, d, and j bits – that way we can see how the C-instructions are being decomposed and their component parts utilized.
For instance, with the D Register at the top: it takes as its input the value output from the ALU, however it only loads that value when the instruction bit [15] is 1 (meaning this is a C instruction) AND that the destination bit [4] is 1 (meaning that the D register is a destination that we want for the ALU’s output).
As another example, consider the program counter: its input is the value on the A Register – that way we can jump to whatever instruction number is specified on the A Register if we get a valid jump command. Otherwise, the program counter will just keep on incrementing. That’s a big if, however. First we check to see if the ALU’s output is negative (ng) AND jump bit [2] is high (meaning we want to jumpt if the output is negative). We also want to simultaneously check if the ALU’s output is zero (zr) AND jump bit [1] is high (meaning we want to jump if the output is equal to 0). And lastly we want to check for the case that the output is greater than zero, which means we want to confirm that jump bit [0] is high (meaning we want to jump if the output is greater than 0) AND that neither ng nor zr is true (i.e., the ALU isn’t outputting 0 or a negative number). If any of these three jump conditions is met, then we jump – if we’re also reading a C-instruction (instruction bit [15] is high).
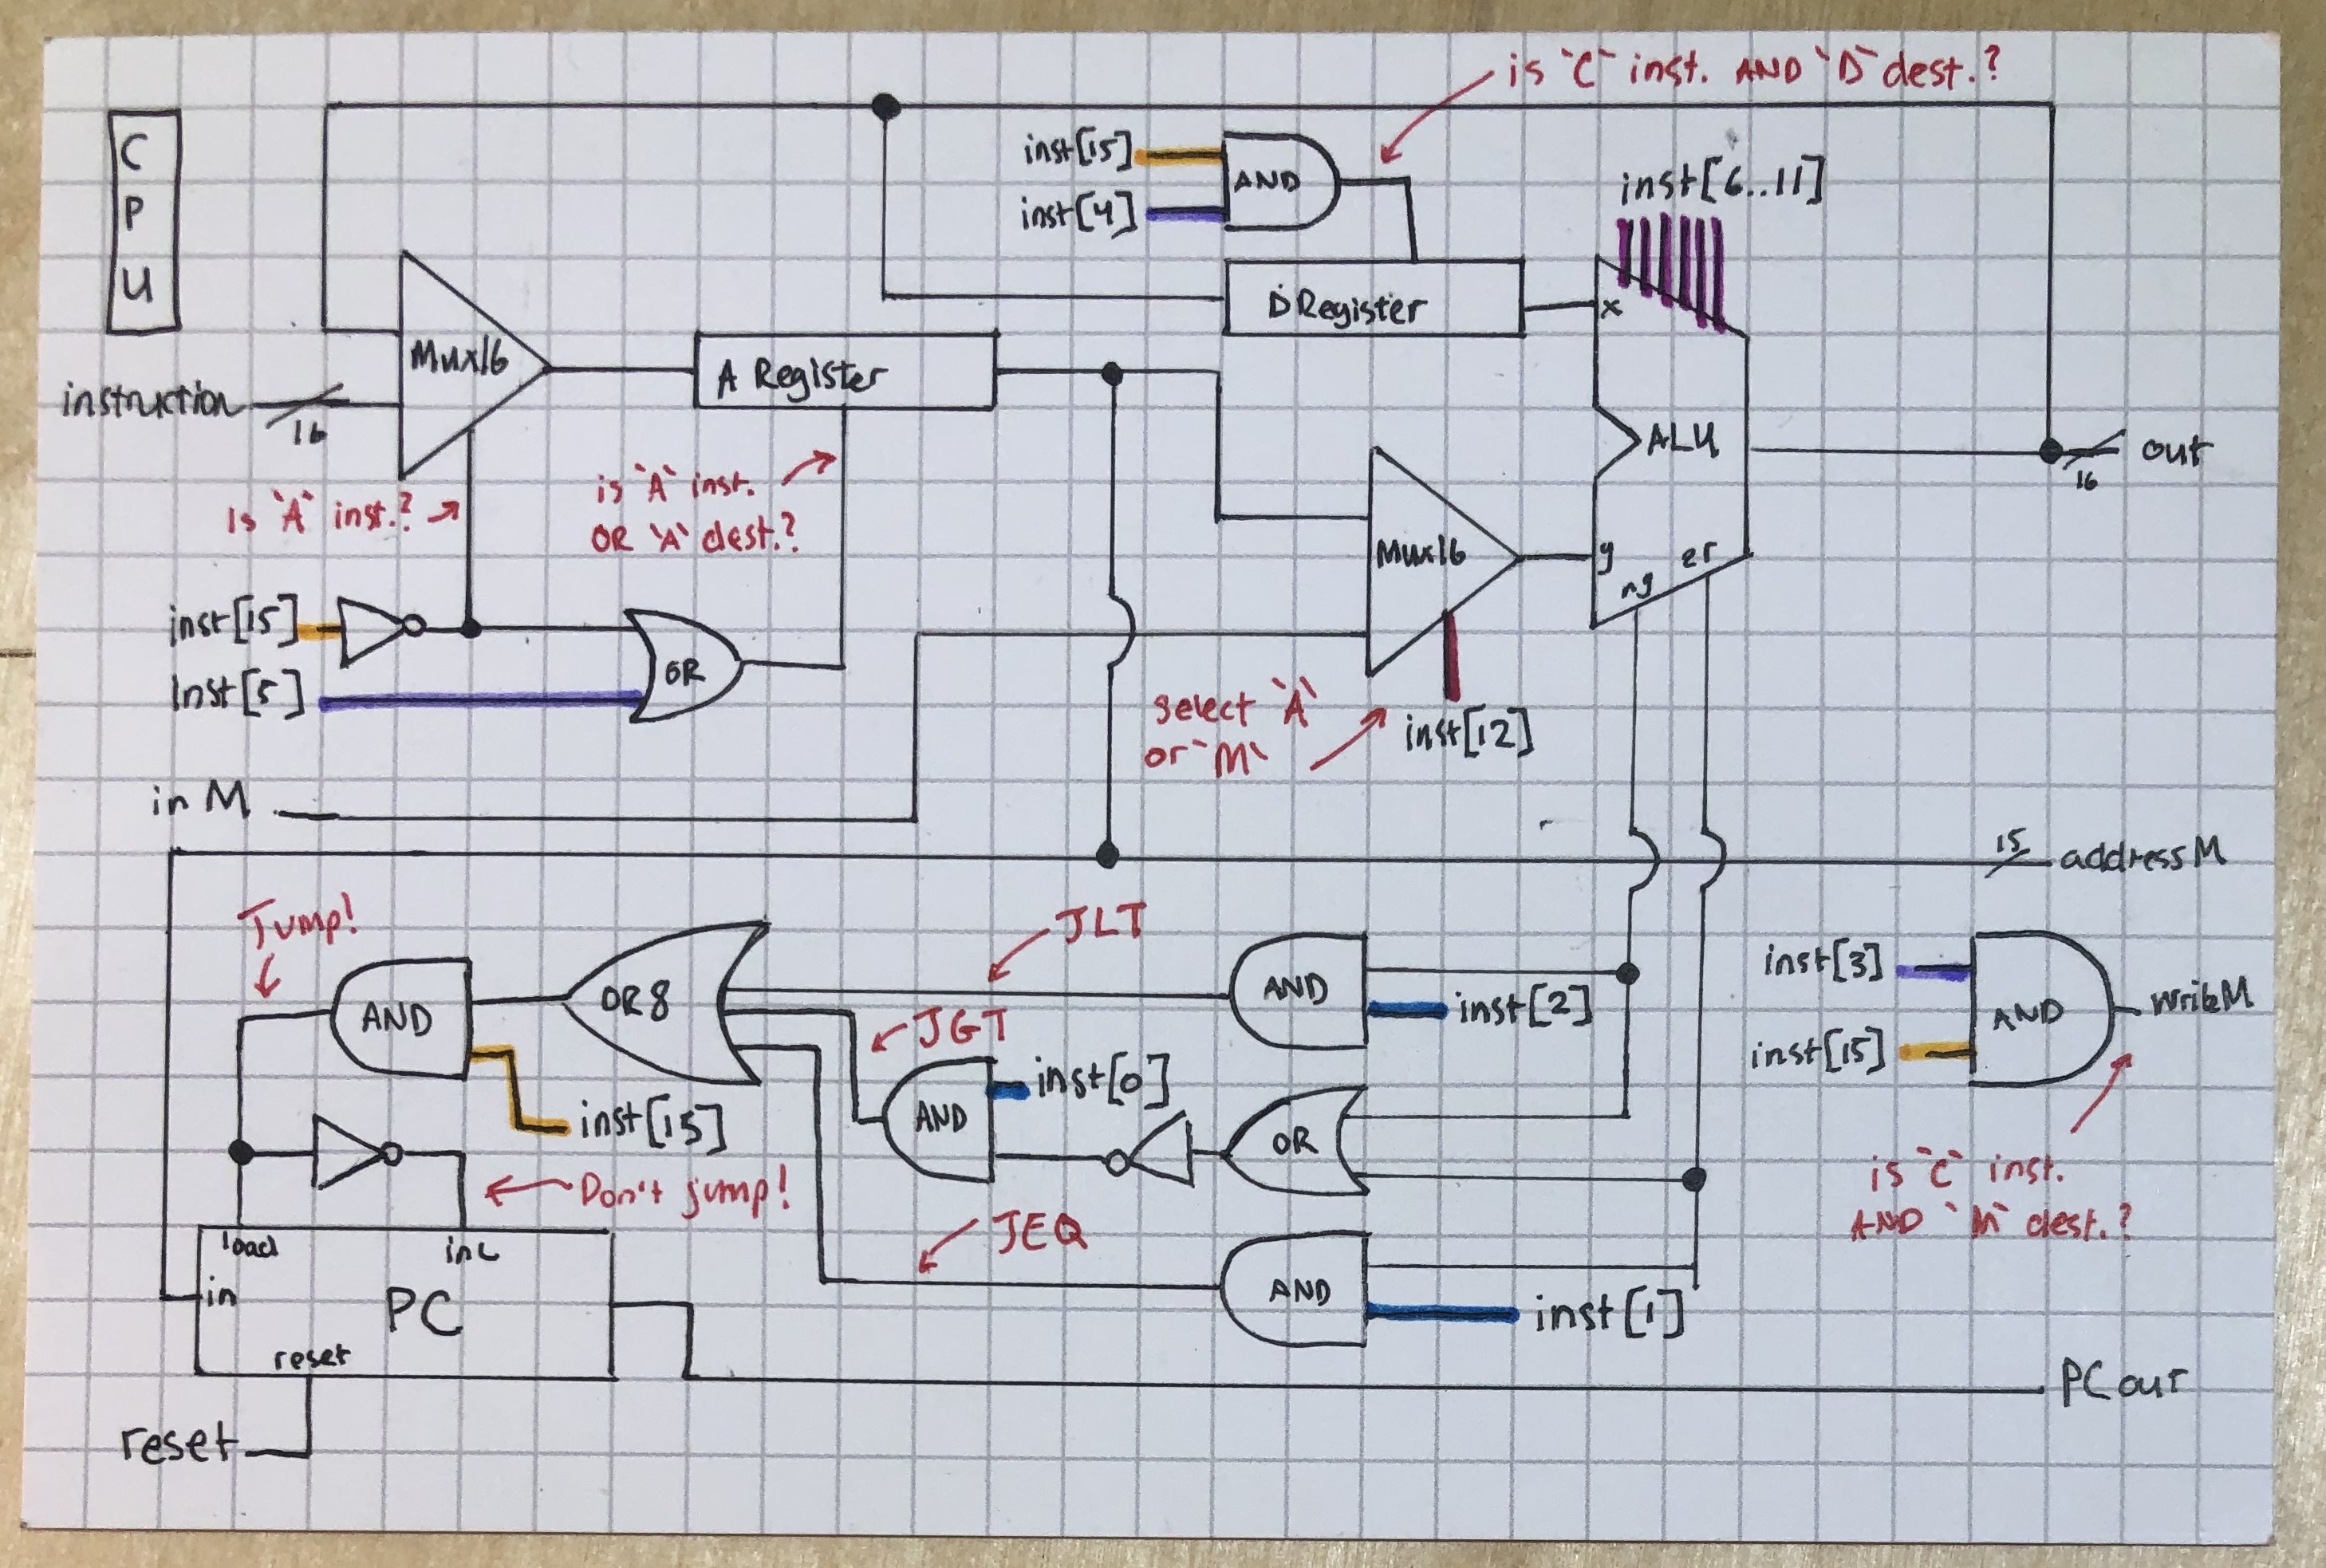
Here’s an annotated version. It helped me, maybe it’ll help you too.
A miscellaneous thought on nand2tetris and why I love it so much
Earlier I mentioned the nand2tetris authors’ decision to build a bunch of components like the ALU and program counter, then turn to writing some code in assembly language, and then returning to logic and chips in building the components that do stuff with that assembly language. It’s little structural decisions like this that convince me that nand2tetris is maybe the best and most effective pedagical model I’ve seen.
In my experience, project-based tutorials and books tend to skew hand-hold-y and, at at worst, can encourage lazy learning. At least for me. Usually what happens is this: I follow the steps, dutifully writing my own code, which is really just a copy of the example code, and pat myself on the back while deluding myself into thinking that I did it myself. The reality is that most of the material will have passed through me, since all of the thinking and problem-solving was done for me.
Nand2tetris is not like this. To the contrary, it gives you some context and background and orientation, allows you to indulge the fantasy that you totally get it and how hard could it be, and then tosses your delusional ass into the deep end and leaves you to figure it out. The bits and pieces of information you need in order not to drown are lurking in there somewhere – sometimes in the form of a diagram you skipped or a paragraph you “definitely read” but didn’t or a previous chapter – but they’re never handed to you. The result is that you really do have to do the deep thinking and heavy lifting yourself, and when you finish you can actually savor the satisfaction of having done tthe thing yourself. When I really think about it, every week I read the chapter, think to myself that it’ll be a cinch, and then stare at the project brief and think it’s actually not possible. And yet every week, I get my act together and figure it out. And that, my friends, is an excellent feeling.
Other things from today that occurred
- Excellent coffee chats. Generally it’s been cool meeting and catching up with folks who come from professional backgrounds in art and music who still maintain their practices.
- Paired a little on the above CPU to squash a few bugs and figure out jump logic
- Finished the Computer chip for nand2tetris (much simpler than the CPU)
- Did Part I of Implement DNS in a Weekend with two other recursers. This is the sort of tutorial that could have taken, I don’t know, 30 minutes if I’d done it alone. But we went through in a thorough and deliberate way, explaining concepts to one another as we went, so the experience was that much deeper and more effective.